前两天做了个docker镜像,可以定时将typecho的文件同步到hexo,在这里记录一下相关内容。
hexo搭建
nodejs
next主题作者建议nodejs版本10.0以上。
git
安装很简单,不多说。
配置用户名和邮箱
安装完成后要配置用户名和邮箱:
git config --global user.name "${GITHUBUSER}"
git config --global user.email "${GITHUBEMAIL}"
密钥
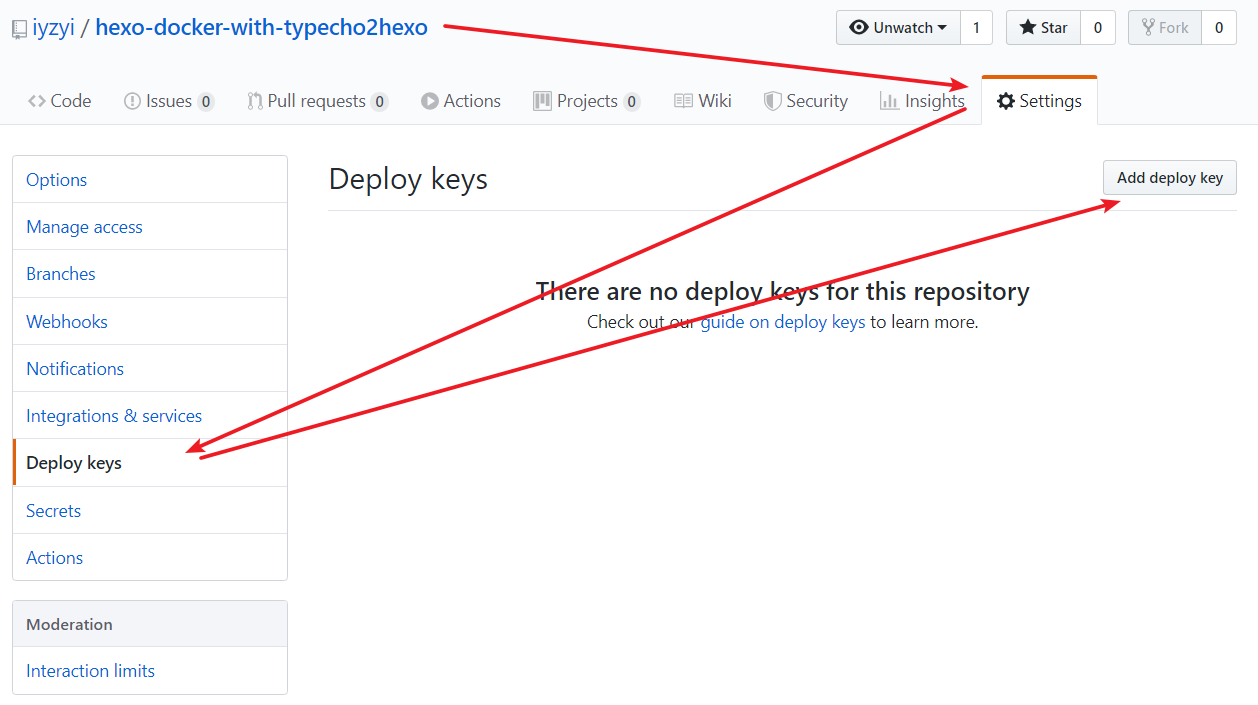
然后要生成密钥,并将公钥复制并粘贴到github的settings -> SSH and GPC keys -> New SSH key中。
ssh-keygen # 后面的三次询问都可以直接回车有以下几点:
- 默认密钥生成在用户文件夹下的
.ssh,比如root用户的/root/.ssh,peppa用户的/home/peppa/.ssh id_rsa.pub是公钥,公钥是可以泄漏的,这个不用担心。

也可以单独为某个项目设置公钥,不过这样的话,拥有的只是这个项目的权限,而且默认读权限,想要写权限要在提交公钥的界面勾选写权限。推送更新是写权限。

下面的命令可以测试是否成功ssh连接到github.
ssh -T git@github.com下图是我在win10上补的,linux上同理。
出现Hi name!就说明成功了。

但是问题来了,ssh-keygen生成密钥需要三次回车,但我要将自动生成密钥写入自动化脚本中,怎么办呢?在stackoverflow中找到了一个答案:
Just use a void pass using -N flag:
ssh-keygen -t rsa -N ''To overwrite the key file (in this example id_rsa):
ssh-keygen -q -t rsa -N '' -f ~/.ssh/id_rsa 2>/dev/null <<< y >/dev/nullFrom ssh-keygen man page:
-N new_passphrase provides the new passphrase.
-q                silence ssh-keygen.
-f filename       specifies the filename of the key file.
Step by step explanation
$ ssh-keygen -t rsa
Generating public/private rsa key pair.
Enter file in which to save the key (/home/klashxx/.ssh/id_rsa):1) To avoid entering the key use -f:
$ ssh-keygen -t rsa -f ~/.ssh/id_rsa
Generating public/private rsa key pair.
/home/klashxx/.ssh/id_rsa already exists.
Overwrite (y/n)?2) Now we need to answer "y" automatically to the overwrite question (let's use a here-string for that job):
$ ssh-keygen -t rsa -f ~/.ssh/id_rsa <<< y
Generating public/private rsa key pair.
/home/klashxx/.ssh/id_rsa already exists.
Overwrite (y/n)? Enter passphrase (empty for no passphrase):3) Finally we're going to use the -N flag to enter a void pass:
$ ssh-keygen -t rsa -N '' -f ~/.ssh/id_rsa <<< y
Generating public/private rsa key pair.
/home/klashxx/.ssh/id_rsa already exists.
Overwrite (y/n)? Your identification has been saved in /home/klashxx/.ssh/id_rsa.
Your public key has been saved in /home/klashxx/.ssh/id_rsa.pub.
The key fingerprint is:
SHA256:Xo0t6caMB/8TSsigxfY28JIfqYjyqxRZrFrPncx5yiU klashxx@server
The key's randomart image is:
+---[RSA 2048]----+
|                 |
|  .              |
|   o .           |
|  +   *    =     |
| +.  + BSo= o    |
|...o.+o+XO...    |
|.. .o.E==+B. .   |
|o . ...=.o...    |
|.+o.  o     ..   |
+----[SHA256]-----+4) Extra ball, cleanup the output, just check the return code:
$ ssh-keygen -q -t rsa -N '' -f ~/.ssh/id_rsa 2>/dev/null <<< y >/dev/null
$ echo $?
0
第一次推送
最后还有一个问题,第一次向github推送时,会弹出询问,是否接受一个位置的host。
本想通过类似于echo y | push command的命令来自动回答yes,但是搜索了半天,才听说git好像禁用了类似这样的管道命令。
在https://superuser.com/a/1368607找到解决方法。
This may be because StrictHostKeyChecking option is set to ask. It may not be set explicitly, ask is the default value.
From man 5 ssh_config:
StrictHostKeyChecking
If this flag is set toyes,ssh(1)will never automatically add host keys to the~/.ssh/known_hostsfile, and refuses to connect to hosts whose host key has changed. This provides maximum protection against trojan horse attacks, though it can be annoying when the/etc/ssh/ssh_known_hostsfile is poorly maintained or when connections to new hosts are frequently made. This option forces the user to manually add all new hosts. If this flag is set tono, ssh will automatically add new host keys to the user known hosts files. If this flag is set toask, new host keys will be added to the user known host files only after the user has confirmed that is what they really want to do, and ssh will refuse to connect to hosts whose host key has changed. The host keys of known hosts will be verified automatically in all cases. The argument must beyes,no, orask. The default isask.
Looks like you would like to set the option to no. In /etc/ssh/ssh_config the line would be:
StrictHostKeyChecking noOr you can override the option during ssh or scp invocation by passing -o StrictHostKeyChecking=no to the tool, e.g:
ssh -o StrictHostKeyChecking=no root@host "command"
scp -o StrictHostKeyChecking=no /local/file root@host:"$directory"/
Note there is also VerifyHostKeyDNS option with the default value ask. Refer to the manual. If you need to change it, the solution is similar.
将/etc/ssh/ssh_configd的StrictHostKeyChecking默认的ask改成no,不询问。
sed 's/# StrictHostKeyChecking ask/StrictHostKeyChecking no/g' -i /etc/ssh/ssh_config字体颜色
默认的输出都是白色,有些重要信息,比如公钥,也是白色的话不容易看到。
a=`cat /root/.ssh/id_rsa.pub`
echo -e "\033[34m$a\033[0m"
具体的颜色代号可以去谷歌一下。
安装HEXO
安装
#安装Hexo
npm install -g hexo-cli
#初始化
hexo init
#安装必备组件
npm install
#安装git插件
npm i hexo-deployer-git
#安装next主题
git clone https://github.com/theme-next/hexo-theme-next.git themes/next
#安装搜索插件
npm install hexo-generator-searchdb --save
#清空所有生成的网页缓存
hexo clean
语法
#生成静态网页并推送至github
hexo g -d
#生成静态网页
hexo g
#推送至github
hexo d
#本地预览博客
hexo s
#新文章
hexo new title
#新页面
hexo new page title
next主题bug
一开始我在win10中发现next主题好多bug,后来才知道,原项目现在停止维护了,现在在维护中的是https://github.com/theme-next/hexo-theme-next.
构建docker时,由于服务器到github的网速过慢,git clone https://github.com/theme-next/hexo-theme-next总是出错,改用git clone https://github.com/theme-next/hexo-theme-next.git就好多了。
自定义域名
ping iyzyi.github.io,得到ip.
然后如图操作:

补充: 其实不需要建立两条记录,只需要新建一条记录就可以了。比如我的域名是iyzyi.com,那么:主机记录填@,记录类型填CNAME,记录值填iyzyi.github.io(我的github page 自定义域名)。这样就可以了。上图的操作是多余的。如果是二级域名,如hexo.iyzyi.com,主机记录填hexo。
并在hexo根目录下的source文件夹中新建CNAME文本,内容为自定义域名,没有http的前缀。然后生成静态页面并上传github.
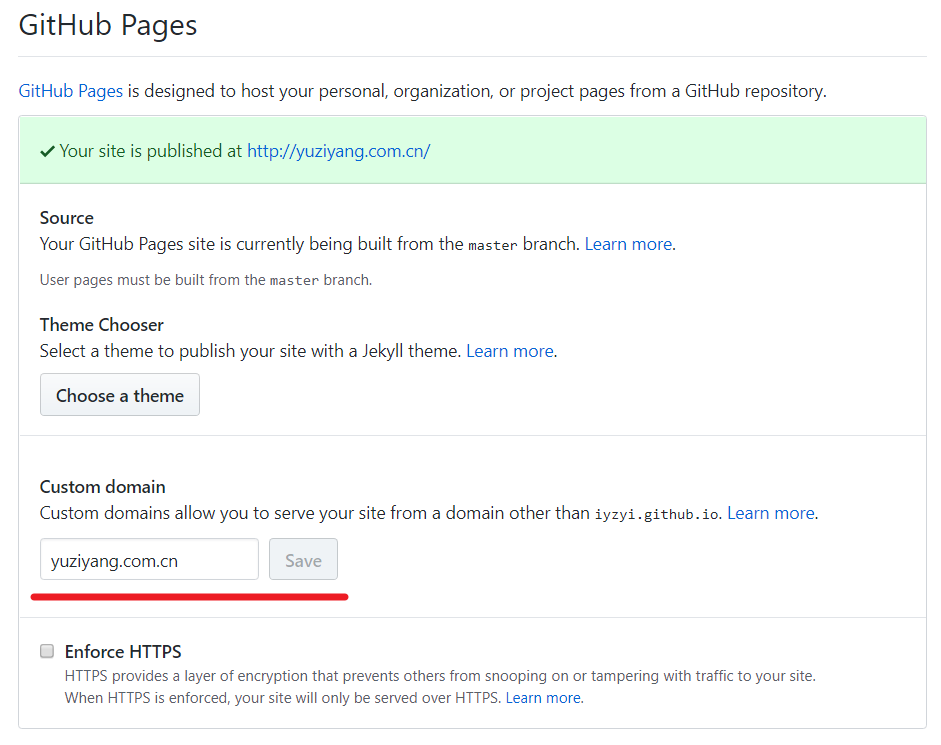
此外,github中该hexo项目->settings->options有下图下划线处内容,我不清楚是因为有CNAME文件才有的此项,还是说也要在此处输入自定义域名。存疑。
补充:经我检验,更新CNAME并推送至github后,github中该hexo项目->settings->options中的自定义域名会自动更新。

typecho2hexo.py
镜像的核心内容。
# 获取系统变量
self.get_env()
# 删除原有的文章markdown,以防typecho中删掉的文章还保存在hexo中
self.delete()
# 从typecho获取数据
if self.mysql():
   # 生成静态网页并上传至github
    self.shell()
python调用shell
os.chdir(self.rootdir)
command = 'hexo g -d'
process = subprocess.Popen(command.split(), stdout=subprocess.PIPE)
output, error = process.communicate()
但是上面的command改成rm -rf时,发现失效了,采用下面的代码:
command = 'rm -rf %s/source/_posts/*' % self.rootdir
subprocess.call(command, shell=True)
两个代码的区别我不清楚。
定时任务crontab
crontab是工业级的代码,几十年来,linux定时任务都是靠它。
语法
crontab -l    #列出所有的定时任务
crontab -e     #编辑定时任务
定时任务的格式:
m h dom mon dow command
#每分钟执行一次
* * * * * user command

#每隔2小时执行一次
* */2 * * * user command (/表示频率)

#每天8:30分执行一次
30 8 * * * user command

#每小时的30和50分各执行一次
30,50 * * * * user command(,表示并列)

#每个月的3号到6号的8:30执行一次
30 8 3-6 * * user command (-表示范围)

#每个星期一的8:30执行一次
30 8 * * 1 user command (周的范围为0-7,0和7代表周日)多条command可以用;或&& 或||连接。
如果每个命令被一个分号 (;) 所分隔,那么命令会连续的执行下去
如果每个命令被 && 号分隔,那么这些命令会一直执行下去,如果中间有错误的命令存在,则不再执行后面的命令,没错则执行到完为止
如果每个命令被双竖线(||)分隔符分隔,如果命令遇到可以成功执行的命令,那么命令停止执行,即使后面还有正确的命令则后面的所有命令都将得不到执行。假如命令一开始就执行失败,那么就会执行 || 后的下一个命令,直到遇到有可以成功执行的命令为止,假如所有的都失败,则所有这些失败的命令都会被尝试执行一次
环境变量
但是我的python脚本的定时任务出错了。
最终排查发现是python代码中并没有获取到系统变量。
搜索得知,crontab并不会读取系统的环境变量,但是会从/etc/environment读取
还要注意/etc/environment本身也有自带了一些环境变量的值,不能单纯的追加,否则会造成,比如说有两个PATH的值之类的问题。
以及,记得重启cron.
rm -rf /etc/environment
env >> /etc/environment
service cron restart
自动化脚本
crontab -e时会打开一个编辑器,让你输入定时任务,自动化脚本中可以这样:
(crontab -l ; echo "1 */3 * * * python3 ${ROOTDIR}/typecho2hexo.py >> ${ROOTDIR}/crontab.log 2>&1;") | crontab -把python3 ${ROOTDIR}/typecho2hexo.py >> ${ROOTDIR}/crontab.log 2>&1;替换成你的定时任务即可。
>> ${ROOTDIR}/crontab.log 2>&1:输出重定向至${ROOTDIR}/crontab.log中
最后
很多涉及的知识点本文并没有提及,累了,先这样吧。
牛蛙牛